
Image via Wikipedia
If you’re using Plesk on a VPS or dedicated server you may want to configure email filtering.
There are two ways to block spam from reaching you on a Plesk server:
- Spam Assassin
- DNS Blacklists
DNS Blacklists can be very helpful, but bear in mind that you need to check what a blacklist is doing (ie. its criteria) before you implement it. You should also keep an eye out for updates and changes, or you can end up facing issues that affected some people earlier this year.
With a blacklist you can decide to simply drop ALL email from certain places.. This may seem like an extreme measure to take, but if you are constantly being spammed then it may help a lot.
SpamAssassin, however, offers you more options. You can choose how you want to handle emails and set scores etc., which gives you and your users a greater level of control.
Setting up both options is quite easy to do with the “Plesk updater”, which also handled installing extra modules.
Login to your Plesk powered server or VPS. You should see a screen a bit like this one: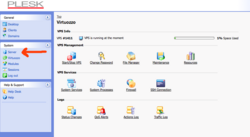 Click on the “Server” link (highlighted in the screenshot above).
That will take you to a screen like this one: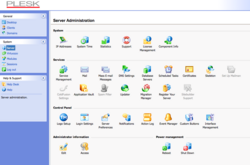 As you can see the “Spam Filter” option is greyed out, as are a few other things. This is because they are not installed.
To install them click on the “Updater” icon and then on the Plesk link.
You’ll then be presented with a screen showing you which tools and modules are installed and which ones aren’t. If you’ve already been “playing around” you may have already installed some of these optional modules. In my case the VPS I’m using is a fresh install, so none of the extras have been either installed or configured:![]() Choose the modules you want to install by clicking in the boxes on the left hand side and then clicking the install link at the top of the screen. You’ll then be taken to a confirmation screen where you can also select which email addres should be sent a notification about the install.
Choose the modules you want to install by clicking in the boxes on the left hand side and then clicking the install link at the top of the screen. You’ll then be taken to a confirmation screen where you can also select which email addres should be sent a notification about the install.
The install can take several minutes, so it’s a good time to go and grab a coffee.
If you now go back into the server section you should see that the Spam Assassin ninja is no longer greyed out and so Spam Assassin is now installed: You can now click on the Ninja icon to setup your SpamAssassin settings for your server or VPS.
So what about the blacklist we mentioned earlier?
It can be configured via the “Mail” icon, which also offers you a bunch of other email settings including checking for SPF records and Domain Keys.
If you have a look at the screenshot below I’ve highlighted 3 of the settings that can be of interest, namely:
- setting email size limits (if you want to block emails based on size)
- SPF settings
- DNS Blackhole (blacklist) settings
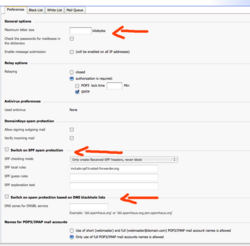 SPF and DomainKeys can help with phishing (both against you / your domains and targetting your users). In terms or DNS blacklists I’d always recommend using Spamhaus‘ lists as they seem to be sanely managed. You can find more information on the Spamhaus site, but I’d recommend using sbl-xbl.spamhaus.org
DO NOT use Spamcop for blocking email. Seriously. Don’t.
If you have any issues with setting up email filtering in Plesk that I haven’t covered please let us know in the comments.
![Reblog this post [with Zemanta]](http://img.zemanta.com/reblog_e.png?x-id=6a5bc699-fcf7-4078-8eef-7815c9c51851)


